35. Hog Sub-sampling Window Search

Hog Sub-sampling Window Search

Now lets explore a more efficient method for doing the sliding window approach, one that allows us to only have to extract the Hog features once, . The code below defines a single function find_cars that's able to both extract features and make predictions.

The find_cars 
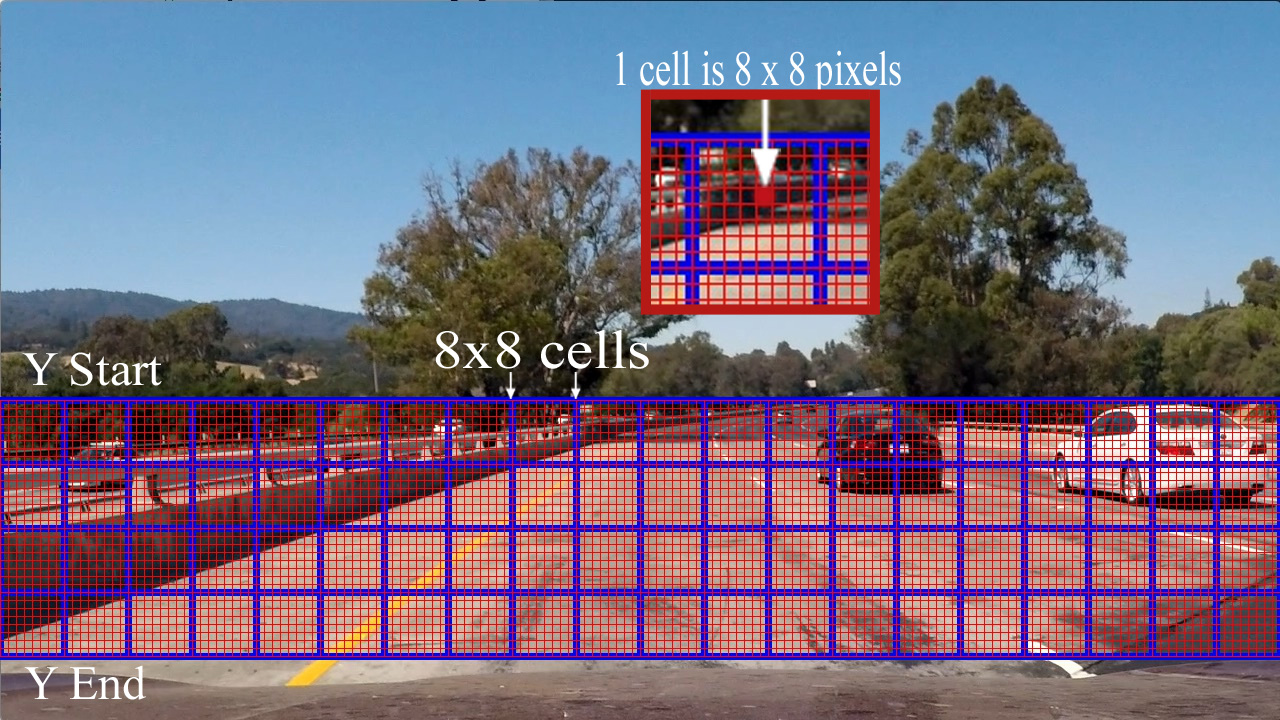
only has to extract hog features once, for each of a small set of predetermined window sizes (defined by a scale argument), and then can be sub-sampled to get all of its overlaying windows. Each window is defined by a scaling factor that impacts the window size. The scale factor can be set on different regions of the image (e.g. small near the horizon, larger in the center).

For our example are using a 64 x 64 base window. If we define pixels per cell as 8 x 8, then a scale of 1 would retain a window that's 8 x 8 cells (8 cells to cover 64 pixels in either direction). An overlap of each window can be defined in terms of the cell distance, using cells_per_step . This means that a cells_per_step = 2 would result in a search window overlap of 75% (2 is 25% of 8, so we move 25% each time, leaving 75% overlap with the previous window). Any value of scale that is larger or smaller than one will scale the base image accordingly, resulting in corresponding change in the number of cells per window. Its possible to run this same function multiple times for different scale values to generate multiple-scaled search windows.

Note in the code below, we load a pre-trained svc model that has been serialized (stored in a pickle file), and then retrieve attributes from loaded svc model.

If you'd like to use this code on your own machine outside of the classroom, you can download the svc model and test image .

Start Quiz:

import matplotlib.image as mpimg
import matplotlib.pyplot as plt
import numpy as np
import pickle
import cv2
from lesson_functions import *

# load a pe-trained svc model from a serialized (pickle) file
dist_pickle = pickle.load( open("svc_pickle.p", "rb" ) )

# get attributes of our svc object
svc = dist_pickle["svc"]
X_scaler = dist_pickle["scaler"]
orient = dist_pickle["orient"]
pix_per_cell = dist_pickle["pix_per_cell"]
cell_per_block = dist_pickle["cell_per_block"]
spatial_size = dist_pickle["spatial_size"]
hist_bins = dist_pickle["hist_bins"]

img = mpimg.imread('test_image.jpg')

# Define a single function that can extract features using hog sub-sampling and make predictions
def find_cars(img, ystart, ystop, scale, svc, X_scaler, orient, pix_per_cell, cell_per_block, spatial_size, hist_bins):
    
    draw_img = np.copy(img)
    img = img.astype(np.float32)/255
    
    img_tosearch = img[ystart:ystop,:,:]
    ctrans_tosearch = convert_color(img_tosearch, conv='RGB2YCrCb')
    if scale != 1:
        imshape = ctrans_tosearch.shape
        ctrans_tosearch = cv2.resize(ctrans_tosearch, (np.int(imshape[1]/scale), np.int(imshape[0]/scale)))
        
    ch1 = ctrans_tosearch[:,:,0]
    ch2 = ctrans_tosearch[:,:,1]
    ch3 = ctrans_tosearch[:,:,2]

    # Define blocks and steps as above
    nxblocks = (ch1.shape[1] // pix_per_cell) - cell_per_block + 1
    nyblocks = (ch1.shape[0] // pix_per_cell) - cell_per_block + 1 
    nfeat_per_block = orient*cell_per_block**2
    
    # 64 was the orginal sampling rate, with 8 cells and 8 pix per cell
    window = 64
    nblocks_per_window = (window // pix_per_cell) - cell_per_block + 1
    cells_per_step = 2  # Instead of overlap, define how many cells to step
    nxsteps = (nxblocks - nblocks_per_window) // cells_per_step + 1
    nysteps = (nyblocks - nblocks_per_window) // cells_per_step + 1
    
    # Compute individual channel HOG features for the entire image
    hog1 = get_hog_features(ch1, orient, pix_per_cell, cell_per_block, feature_vec=False)
    hog2 = get_hog_features(ch2, orient, pix_per_cell, cell_per_block, feature_vec=False)
    hog3 = get_hog_features(ch3, orient, pix_per_cell, cell_per_block, feature_vec=False)
    
    for xb in range(nxsteps):
        for yb in range(nysteps):
            ypos = yb*cells_per_step
            xpos = xb*cells_per_step
            # Extract HOG for this patch
            hog_feat1 = hog1[ypos:ypos+nblocks_per_window, xpos:xpos+nblocks_per_window].ravel() 
            hog_feat2 = hog2[ypos:ypos+nblocks_per_window, xpos:xpos+nblocks_per_window].ravel() 
            hog_feat3 = hog3[ypos:ypos+nblocks_per_window, xpos:xpos+nblocks_per_window].ravel() 
            hog_features = np.hstack((hog_feat1, hog_feat2, hog_feat3))

            xleft = xpos*pix_per_cell
            ytop = ypos*pix_per_cell

            # Extract the image patch
            subimg = cv2.resize(ctrans_tosearch[ytop:ytop+window, xleft:xleft+window], (64,64))
          
            # Get color features
            spatial_features = bin_spatial(subimg, size=spatial_size)
            hist_features = color_hist(subimg, nbins=hist_bins)

            # Scale features and make a prediction
            test_features = X_scaler.transform(np.hstack((spatial_features, hist_features, hog_features)).reshape(1, -1))    
            #test_features = X_scaler.transform(np.hstack((shape_feat, hist_feat)).reshape(1, -1))    
            test_prediction = svc.predict(test_features)
            
            if test_prediction == 1:
                xbox_left = np.int(xleft*scale)
                ytop_draw = np.int(ytop*scale)
                win_draw = np.int(window*scale)
                cv2.rectangle(draw_img,(xbox_left, ytop_draw+ystart),(xbox_left+win_draw,ytop_draw+win_draw+ystart),(0,0,255),6) 
                
    return draw_img
    
ystart = 400
ystop = 656
scale = 1.5
    
out_img = find_cars(img, ystart, ystop, scale, svc, X_scaler, orient, pix_per_cell, cell_per_block, spatial_size, hist_bins)

plt.imshow(out_img)
import numpy as np
import cv2
from skimage.feature import hog

def convert_color(img, conv='RGB2YCrCb'):
    if conv == 'RGB2YCrCb':
        return cv2.cvtColor(img, cv2.COLOR_RGB2YCrCb)
    if conv == 'BGR2YCrCb':
        return cv2.cvtColor(img, cv2.COLOR_BGR2YCrCb)
    if conv == 'RGB2LUV':
        return cv2.cvtColor(img, cv2.COLOR_RGB2LUV)

def get_hog_features(img, orient, pix_per_cell, cell_per_block, 
                        vis=False, feature_vec=True):
    # Call with two outputs if vis==True
    if vis == True:
        features, hog_image = hog(img, orientations=orient, 
                                  pixels_per_cell=(pix_per_cell, pix_per_cell),
                                  cells_per_block=(cell_per_block, cell_per_block),
                                  block_norm= 'L2-Hys',
                                  transform_sqrt=False, 
                                  visualise=vis, feature_vector=feature_vec)
        return features, hog_image
    # Otherwise call with one output
    else:      
        features = hog(img, orientations=orient, 
                       pixels_per_cell=(pix_per_cell, pix_per_cell),
                       cells_per_block=(cell_per_block, cell_per_block),
                       block_norm= 'L2-Hys',
                       transform_sqrt=False, 
                       visualise=vis, feature_vector=feature_vec)
        return features

def bin_spatial(img, size=(32, 32)):
    color1 = cv2.resize(img[:,:,0], size).ravel()
    color2 = cv2.resize(img[:,:,1], size).ravel()
    color3 = cv2.resize(img[:,:,2], size).ravel()
    return np.hstack((color1, color2, color3))
                        
def color_hist(img, nbins=32):    #bins_range=(0, 256)
    # Compute the histogram of the color channels separately
    channel1_hist = np.histogram(img[:,:,0], bins=nbins)
    channel2_hist = np.histogram(img[:,:,1], bins=nbins)
    channel3_hist = np.histogram(img[:,:,2], bins=nbins)
    # Concatenate the histograms into a single feature vector
    hist_features = np.concatenate((channel1_hist[0], channel2_hist[0], channel3_hist[0]))
    # Return the individual histograms, bin_centers and feature vector
    return hist_features